
1. Build Integration
Integrate Web Standard Checkout.
2. Test Integration
Test the integration by making a test payment.
3. Go-live Checklist
Check the go-live checklist.
1. Build Integration
Follow the steps given below:1.1 Create an Order in Server
1.1 Create an Order in Server
Given below are the order states and the corresponding payment states:Use the below endpoint to create an order in your (backend) server.POST An order id (referred as
Capture Payments AutomaticallyYou can capture payments automatically with the one-time Payment Capture setting configuration on the Dashboard.
Order is an important step in the payment process.
- An order should be created for every payment.
- You can create an order using the Orders API. It is a server-side API call. Know how to authenticate Orders API.
- The
order_idreceived in the response should be passed to the checkout. This ties the order with the payment and secures the request from being tampered.
/orders- Success Response
- Failure Response
order_id) is generated on the successful creation of an order. You should store this order id in your system against the order.Know more about Orders API.Handy TipsUnder the Authorization section in Postman, select Basic Auth and add the Key Id and secret as the Username and Password, respectively.
Request Parameters
integer
required
The transaction amount, expressed in the currency subunit. For example, for an actual amount of ₹222.25, the value of this field should be
22225.string
required
The currency in which the transaction should be made. See the list of supported currencies. Length must be of 3 characters.
string
Your receipt id for this order should be passed here. Maximum length is 40 characters.
object
Key-value pair that can be used to store additional information about the entity. Maximum 15 key-value pairs, 256 characters (maximum) each. For example,
"note_key": "Beam me up Scotty".boolean
Indicates whether the customer can make a partial payment. Possible values:
true: The customer can make partial payments.false(default): The customer cannot make partial payments.
integer
Minimum amount that must be paid by the customer as the first partial payment. For example, if an amount of ₹7,000 is to be received from the customer in two installments of #1 - ₹5,000, #2 - ₹2,000, then you can set this value as
500000. This parameter should be passed only if partial_payment is true.Response Parameters
Descriptions for the response parameters are present in the Orders Entity parameters table.Error Response Parameters
The error response parameters are available in the API Reference Guide.1.2 Integrate with Checkout on Client-Side
1.2 Integrate with Checkout on Client-Side
Add the Pay button on your web page using the checkout code. You can use the handler function or callback URL.
1.2.1 Handler Function or Callback URL
1.2.1 Handler Function or Callback URL
1.2.3 Checkout Options
1.2.3 Checkout Options
string
required
API Key ID generated from the Dashboard.
integer
required
Payment amount in the smallest currency subunit. For example, if the amount to be charged is ₹2222.50, enter
222250 in this field. In the case of three decimal currencies, such as KWD, BHD and OMR, to accept a payment of 295.991, pass the value as 295990. And in the case of zero decimal currencies such as JPY, to accept a payment of 295, pass the value as 295.string
required
The currency in which the payment should be made by the customer. See the list of supported currencies.
Handy TipsRazorpay has added support for zero decimal currencies, such as JPY, and three decimal currencies, such as KWD, BHD, and OMR, allowing businesses to accept international payments in these currencies. Know more about Currency Conversion.
string
required
Your Business/Enterprise name shown on the Checkout form. For example, Acme Corp.
string
Description of the purchase item shown on the Checkout form. It should start with an alphanumeric character.
string
Link to an image (usually your business logo) shown on the Checkout form. Can also be a base64 string if you are not loading the image from a network.
string
required
Order ID generated via Orders API.
object
You can prefill the following details at Checkout.
Boost Conversions and Minimise Drop-offs
- Autofill customer contact details, especially phone number to ease form completion. Include customer’s phone number in the
contactparameter of the JSON request’sprefillobject. Format: +(country code)(phone number). Example: “contact”: “+919000090000”. - This is not applicable if you do not collect customer contact details on your website before checkout, have Shopify stores or use any of the no-code apps.
name(optional): Cardholder’s name to be prefilled if customer is to make card payments on Checkout. For example, Gaurav Kumar.email(optional): Email address of the customer.contact(optional): Phone number of the customer. The expected format of the phone number is+ {country code}{phone number}. If the country code is not specified,91will be used as the default value. This is particularly important while prefillingcontactof customers with phone numbers issued outside India. Examples: +14155552671 (a valid non-Indian number), +919977665544 (a valid Indian number). If 9977665544 is entered,+91is added to it as +919977665544.method(optional): Pre-selection of the payment method for the customer. Will only work ifcontactandemailare also prefilled. Possible values:card,netbanking,wallet,upi,emi.
object
Set of key-value pairs that can be used to store additional information about the payment. It can hold a maximum of 15 key-value pairs, each 256 characters long (maximum).
object
Thematic options to modify the appearance of Checkout.
color(optional): Enter your brand colour’s HEX code to alter the text, payment method icons and CTA (call-to-action) button colour of the Checkout form.backdrop_color(optional): Enter a HEX code to change the Checkout’s backdrop colour.
object
Options to handle the Checkout modal.
backdropclose(optional): Indicates whether clicking the translucent blank space outside the Checkout form should close the form. Possible values:true(Closes the form when your customer clicks outside),false(default - Does not close the form).escape(optional): Indicates whether pressing the escape key should close the Checkout form. Possible values:true(default - Closes the form),false(Does not close the form).handleback(optional): Determines whether Checkout must behave similar to the browser when back button is pressed. Possible values:true(default - Checkout behaves similarly to the browser),false(Checkout does not simulate a back press).confirm_close(optional): Determines whether a confirmation dialog box should be shown if customers attempts to close Checkout. Possible values:true(Confirmation dialog box is shown),false(default - No confirmation dialog).ondismiss(optional): Used to track the status of Checkout. You can pass a modal object withondismiss: function(){}as options. This function is called when the modal is closed by the user.animation(optional): Shows an animation before loading of Checkout. Possible values:true(default - Animation appears),false(Animation does not appear).
string
If you are accepting recurring payments using Razorpay Checkout, you should pass the relevant
subscription_id to the Checkout. Know more about Subscriptions on Checkout.boolean
Permit or restrict customer from changing the card linked to the subscription. Possible values:
true (Allow the customer to change the card), false (default - Do not allow).boolean
Determines if you are accepting recurring (charge-at-will) payments on Checkout via instruments such as emandate, paper NACH and so on. Possible values:
true (Accepting recurring payments), false (default - Not accepting recurring payments).string
Customers will be redirected to this URL on successful payment. Ensure that the domain of the Callback URL is allowlisted.
boolean
Determines whether to post a response to the event handler post payment completion or redirect to Callback URL.
callback_url must be passed while using this parameter. Possible values: true (Customer is redirected to the specified callback URL in case of payment failure), false (default - Customer is shown the Checkout popup to retry the payment).string
Unique identifier of customer. Used for:
- Local saved cards feature.
- Static bank account details on Checkout in case of Bank Transfer payment method.
boolean
Determines whether to allow saving of cards. Can also be configured via the Dashboard. Possible values:
true (Enables card saving feature), false (default - Disables card saving feature).integer
Sets a timeout on Checkout, in seconds. After the specified time limit, the customer will not be able to use Checkout.
object
Marks fields as read-only.
contact(optional): Used to set thecontactfield as readonly. Possible values:true(Customer will not be able to edit this field),false(default - Customer can edit).email(optional): Used to set theemailfield as readonly. Possible values:true(Customer will not be able to edit this field),false(default - Customer can edit).name(optional): Used to set thenamefield as readonly. Possible values:true(Customer will not be able to edit this field),false(default - Customer can edit).
Hides the contact details.
contact(optional): Used to set thecontactfield as optional. Possible values:true(Customer will not be able to view this field),false(default - Customer can view).email(optional): Used to set theemailfield as optional. Possible values:true(Customer will not be able to view this field),false(default - Customer can view).
boolean
Used to auto-read OTP for cards and netbanking pages. Applicable from Android SDK version 1.5.9 and above. Possible values:
true (OTP is auto-read), false (default - OTP is not auto-read).boolean
Used to rotate payment page as per screen orientation. Applicable from Android SDK version 1.6.4 and above. Possible values:
true (Payment page can be rotated), false (default - Payment page cannot be rotated).object
Parameters that enable retry of payment on the checkout.
enabled: Determines whether the customers can retry payments on the checkout. Possible values:true(default - Enables customers to retry payments),false(Disables customers from retrying the payment).max_count: The number of times the customer can retry the payment. We recommend you to set this to 4. Having a larger number here can cause loops to occur.
object
Parameters that enable checkout configuration. Know more about how to configure payment methods on Razorpay standard checkout.
display: Child parameter that enables configuration of checkout display language.language: The language in which checkout should be displayed. Possible values:en(English),ben(Bengali),hi(Hindi),mar(Marathi),guj(Gujarati),tam(Tamil),tel(Telugu).
1.2.4 Errors
1.2.4 Errors
Given below is a list of errors you may face while integrating with checkout on the client-side.
1.2.5 Configure Payment Methods (Optional)
1.2.5 Configure Payment Methods (Optional)
Multiple payment methods are available on the Razorpay Web Standard Checkout.
- The payment methods are fixed and cannot be changed.
- You can configure the order or make certain payment methods prominent. Know more about configuring payment methods.
1.3 Handle Payment Success and Failure
1.3 Handle Payment Success and Failure
The way the Payment Success and Failure scenarios are handled depends on the Checkout Sample Code you used in the last step.
Checkout with Handler Function
If you used the sample code with the handler function:- Payment Success
- Payment Failure
On Payment SuccessThe customer sees your website page. The checkout returns the response object of the successful payment (
razorpay_payment_id, razorpay_order_id and razorpay_signature). Collect these and send them to your server.Checkout with Callback URL
If you used the sample code with the callback URL:- Payment Success
- Payment Failure
On Payment SuccessRazorpay makes a POST call to the callback URL with the
razorpay_payment_id, razorpay_order_id and razorpay_signature in the response object of the successful payment. Only successful authorisations are auto-submitted.1.4 Store Fields in Your Server
1.4 Store Fields in Your Server
A successful payment returns the following fields to the Checkout form.
- You need to store these fields in your server.
- You can confirm the authenticity of these details by verifying the signature in the next step.
1.5 Verify Payment Signature
1.5 Verify Payment Signature
This is a mandatory step to confirm the authenticity of the details returned to the Checkout form for successful payments.To verify the
razorpay_signature returned to you by the Checkout form:-
Create a signature in your server using the following attributes:
order_id: Retrieve theorder_idfrom your server. Do not use therazorpay_order_idreturned by Checkout.razorpay_payment_id: Returned by Checkout.key_secret: Available in your server. Thekey_secretthat was generated from the Dashboard.
-
Use the SHA256 algorithm, the
razorpay_payment_idand theorder_idto construct a HMAC hex digest as shown below: -
If the signature you generate on your server matches the
razorpay_signaturereturned to you by the Checkout form, the payment received is from an authentic source.
Generate Signature on Your Server
Given below is the sample code for payment signature verification:Post Signature Verification
After you have completed the integration, you can set up webhooks, make test payments, replace the test key with the live key and integrate with other APIs.Here are the links to our SDKs for the supported platforms.1.6 Verify Payment Status
1.6 Verify Payment Status
Handy TipsOn the Razorpay Dashboard, ensure that the payment status is
captured. Refer to the payment capture settings page to know how to capture payments automatically.- From Dashboard
- Using Webhooks
- Poll APIs
To verify the payment status from the Razorpay Dashboard:
- Log in to the Razorpay Dashboard and navigate to Transactions → Payments.
- Check if a Payment Id has been generated and note the status. In case of a successful payment, the status is marked as Captured.
2. Test Integration
After the integration is complete, a Pay button appears on your webpage/app.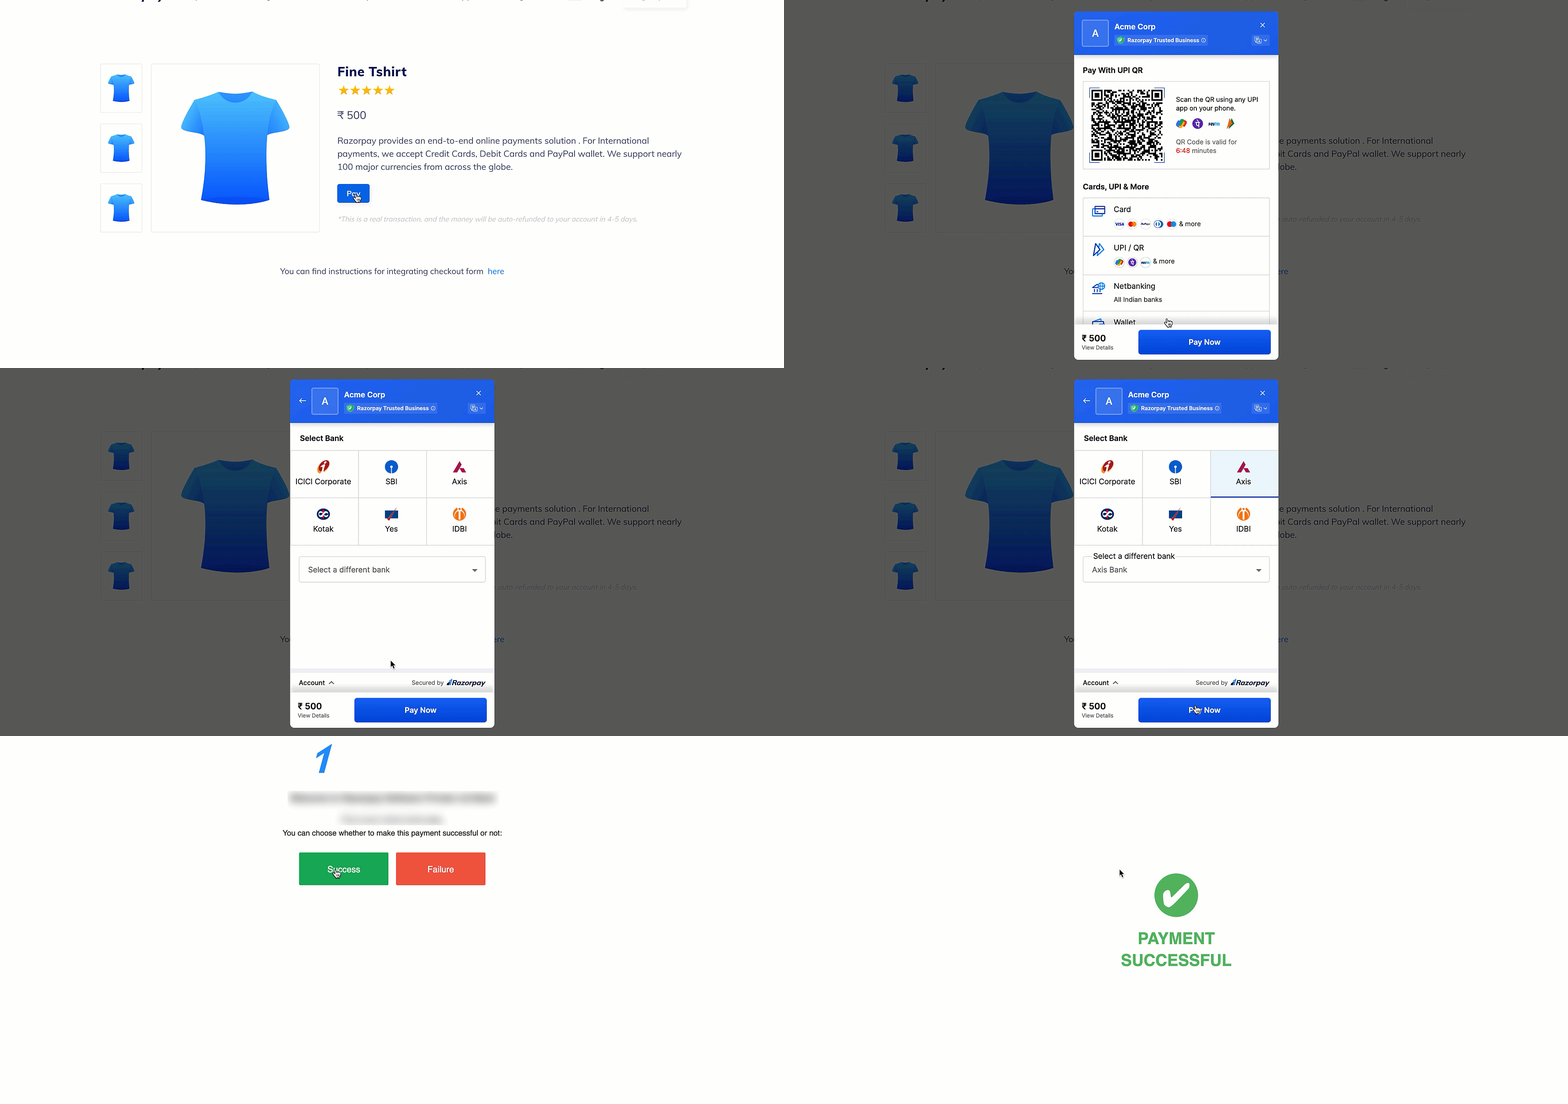
You can make test payments using one of the payment methods configured at the Checkout.
Netbanking
Netbanking
You can select any of the listed banks. After choosing a bank, Razorpay will redirect to a mock page where you can make the payment
success or a failure. Since this is Test Mode, we will not redirect you to the bank login portals.Check the list of supported banks.UPI
UPI
You can enter one of the following UPI IDs:
success@razorpay: To make the payment successful.failure@razorpay: To fail the payment.
Handy TipsYou can use Test Mode to test UPI payments, and Live Mode for UPI Intent and QR payments.
Cards
Cards
You can use the following test cards to test transactions for your integration in Test Mode.
Domestic Cards
Use the following test cards for Indian payments:Error Scenarios
Use these test cards to simulate payment errors. See the complete list of error test cards with detailed scenarios.Check the following lists:International Cards
Use the following test cards to test international payments. Use any valid expiration date in the future in the MM/YY format and any random CVV to create a successful payment.Check the list of supported card networks.
Wallet
Wallet
You can select any of the listed wallets. After choosing a wallet, Razorpay will redirect to a mock page where you can make the payment
success or a failure. Since this is Test Mode, we will not redirect you to the wallet login portals.Check the list of supported wallets.3. Go-live Checklist
Check the go-live checklist for Razorpay Web Standard Checkout integration. Consider these steps before taking the integration live.3.1 Accept Live Payments
3.1 Accept Live Payments
Perform an end-to-end simulation of funds flow in the Test Mode. Once confident that the integration is working as expected, switch to the Live Mode and start accepting payments from customers.To generate API Keys in Live Mode on your Razorpay Dashboard:
- Log in to the Razorpay Dashboard and switch to Live Mode on the menu.
- Navigate to Account & Settings → API Keys → Generate Key to generate the API Key for Live Mode.
- Download the keys and save them securely.
- Replace the Test API Key with the Live Key in the Checkout code and start accepting actual payments.
3.2 Payment Capture
3.2 Payment Capture
After payment is
authorized, you need to capture it to settle the amount to your bank account as per the settlement schedule. Payments that are not captured are auto-refunded after a fixed time.- Automatic Capture
- Manual Capture
Authorized payments can be automatically captured. You can auto-capture all payments using global settings on the Razorpay Dashboard. Know more about capture settings for payments.
3.3 Set Up Webhooks
3.3 Set Up Webhooks
Ensure you have set up webhooks in the live mode and configured the events for which you want to receive notifications.